728x90
반응형
1. Gradle 추가

// 바텀다이얼로그
    implementation 'com.google.android.material:material:1.0.0'
2. activity_main.xml
<?xml version="1.0" encoding="utf-8"?>
<LinearLayout
    xmlns:android="http://schemas.android.com/apk/res/android"
    xmlns:tools="http://schemas.android.com/tools"
    android:layout_width="match_parent"
    android:layout_height="match_parent"
    android:orientation="vertical"
    tools:context=".MainActivity">

    <View
        android:layout_width="0dp"
        android:layout_height="0dp"
        android:layout_weight="1"/>

    <Button
        android:id="@+id/btn"
        android:layout_width="match_parent"
        android:layout_height="wrap_content"
        android:layout_gravity="center"
        android:text="버튼"/>

    <View
        android:layout_width="0dp"
        android:layout_height="0dp"
        android:layout_weight="1"/>
</LinearLayout>
3. bottom_sheet_layout.xml 추가 (원하는 레이아웃으로 꾸며주면 됩니다.)
<?xml version="1.0" encoding="utf-8"?>
<LinearLayout
    xmlns:android="http://schemas.android.com/apk/res/android"
    android:orientation="vertical"
    android:layout_width="match_parent"
    android:layout_height="wrap_content">

    <Button
        android:id="@+id/one_btn"
        android:layout_width="match_parent"
        android:layout_height="wrap_content"
        android:text="1번 버튼"/>

    <Button
        android:id="@+id/second_btn"
        android:layout_width="match_parent"
        android:layout_height="wrap_content"
        android:text="2번 버튼"/>

    <Button
        android:id="@+id/third_btn"
        android:layout_width="match_parent"
        android:layout_height="wrap_content"
        android:text="3번 버튼"/>

</LinearLayout>
4. MainActivity
package com.caru.bottomsheet

import androidx.appcompat.app.AppCompatActivity
import android.os.Bundle
import android.view.View
import com.google.android.material.bottomsheet.BottomSheetBehavior
import com.google.android.material.bottomsheet.BottomSheetDialog
import kotlinx.android.synthetic.main.activity_main.*

class MainActivity : AppCompatActivity() {

    override fun onCreate(savedInstanceState: Bundle?) {
        super.onCreate(savedInstanceState)
        setContentView(R.layout.activity_main)

        // 바텀 다이얼로그
        val bottomSheetCallback = object : BottomSheetBehavior.BottomSheetCallback() {
            override fun onSlide(p0: View, p1: Float) {
            }

            override fun onStateChanged(p0: View, p1: Int) {
            }
        }

        // 따로 만든 레이아웃을 넣어주면 된다.
        val bottomSheetView = layoutInflater.inflate(R.layout.bottom_sheet_layout, null)
        val bottomSheetDialog = BottomSheetDialog(this)
        bottomSheetDialog.setContentView(bottomSheetView)

        val bottomSheetBehavior = BottomSheetBehavior.from(bottomSheetView.parent as View)
        bottomSheetBehavior.setBottomSheetCallback(bottomSheetCallback)

        // 클릭시 바텀다이얼로그 올라옴
        btn.setOnClickListener {
            bottomSheetBehavior.state = BottomSheetBehavior.STATE_EXPANDED
            bottomSheetDialog.show()
        }

    }
}
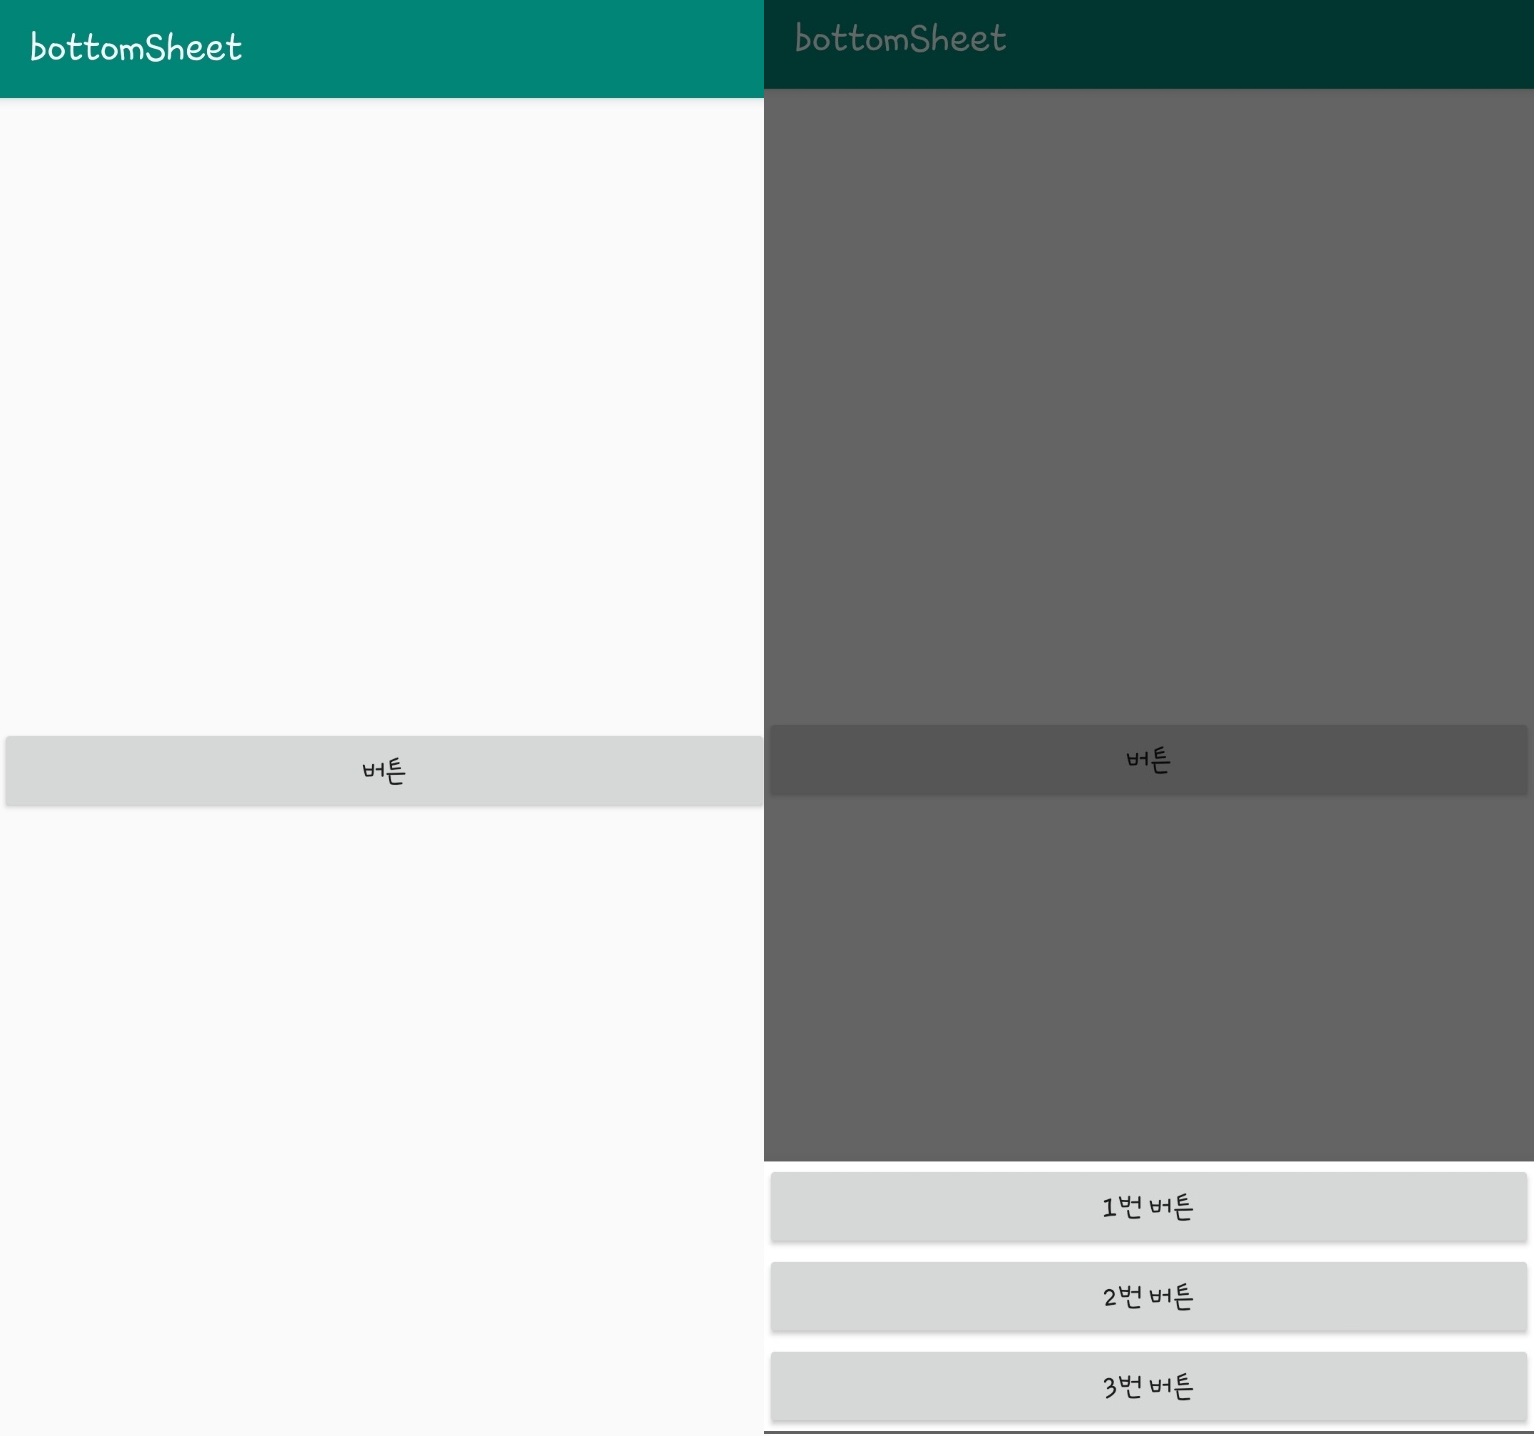
5. 결과
6. 다이얼로그 뷰 제어하기
import androidx.appcompat.app.AppCompatActivity
import android.os.Bundle
import android.view.View
import android.widget.Button
import android.widget.Toast
import com.google.android.material.bottomsheet.BottomSheetBehavior
import com.google.android.material.bottomsheet.BottomSheetDialog
import com.google.android.material.snackbar.Snackbar
import kotlinx.android.synthetic.main.activity_main.*

class MainActivity : AppCompatActivity() {

    override fun onCreate(savedInstanceState: Bundle?) {
        super.onCreate(savedInstanceState)
        setContentView(R.layout.activity_main)

        // 바텀 다이얼로그
        val bottomSheetCallback = object : BottomSheetBehavior.BottomSheetCallback() {
            override fun onSlide(p0: View, p1: Float) {
            }

            override fun onStateChanged(p0: View, p1: Int) {
            }
        }

        // 따로 만든 레이아웃을 넣어주면 된다.
        val bottomSheetView = layoutInflater.inflate(R.layout.bottom_sheet_layout, null)
        val bottomSheetDialog = BottomSheetDialog(this)
        bottomSheetDialog.setContentView(bottomSheetView)

        val bottomSheetBehavior = BottomSheetBehavior.from(bottomSheetView.parent as View)
        bottomSheetBehavior.setBottomSheetCallback(bottomSheetCallback)

        // 클릭시 바텀다이얼로그 올라옴
        btn.setOnClickListener {
            bottomSheetBehavior.state = BottomSheetBehavior.STATE_EXPANDED
            bottomSheetDialog.show()
        }

        // 추가
        // 바텀 다이얼로그 레이아웃 변수 등록
        val one_btn = bottomSheetView.findViewById<Button>(R.id.one_btn)
        val second_btn = bottomSheetView.findViewById<Button>(R.id.one_btn)
        val third_btn = bottomSheetView.findViewById<Button>(R.id.one_btn)

        // 1번 버튼 클릭시 이벤트
        one_btn.setOnClickListener {
            Toast.makeText(this,"1번 버튼 입니다.",Toast.LENGTH_SHORT).show()
        }

        // 2번 버튼 클릭시 이벤트
        second_btn.setOnClickListener {
            Snackbar.make(it, "2번 버튼 입니다..", Snackbar.LENGTH_SHORT).show()
        }

        // 3번 버튼 클릭시 이벤트
        third_btn.setOnClickListener {
            Toast.makeText(this,"3번 버튼 입니다.",Toast.LENGTH_SHORT).show()
        }
    }
}
다이얼로그 레이아웃에 있는 뷰를 변수로 등록해준뒤 사용하면 됩니다.
728x90
반응형
'Android > UI' 카테고리의 다른 글
| [Android] RecyclerView Drag & Drop (0) | 2022.07.28 |
|---|